Export SQL Server Data to Oracle using SSIS
Problem
I have some SQL Server data that I need to export and load into an Oracle database. In this tip we cover how this can be done with SSIS.
Solution
SQL Server Integration Services (SSIS) would be a good choice for getting data out of a SQL Server database and loading it into an Oracle database. SSIS was first released with SQL Server 2005; prior to that SQL Server included a tool called Data Transformation Services (DTS) which would also work. Since DTS is a tool that was included with SQL Server 7 and SQL Server 2000, we'll use SSIS in this tip.
SSIS is a tool that is typically used in the extract, transform and load (ETL) process in a data warehouse. It provides a graphical designer that allows you to easily pull data from one database, perform some transformations on the data, then load it into another database. For a detailed introduction to SSIS, take a look at our SQL Server Integration Services Tutorial.
In this tip we will use the SQL Server Import and Export Data wizard which will walk us through the steps to export data from a SQL Server database and load it into an Oracle database. In addition the wizard will automatically generate an SSIS package that can be run using DTEXEC.EXE or DTEXECUI.EXE. DTEXEC is a command line tool for running an SSIS package; DTEXECUI provides a graphical user interface for running an SSIS package. Both utilities are included with SQL Server.
Setup
I have a virtual machine with SQL Server 2008 Developer Edition, Oracle 10g, and the Oracle 9i client.
Sample Database
We need a sample SQL Server database. I'm sure we're all tired of seeing the pubs, northwind and adventureworks sample databases. To break the monotony we'll use the Chinook sample database which you can retrieve from theCodePlex site. The Chinook database contains tables for artists, albums, media tracks, etc. It contains scripts to create and load multiple databases: SQL Server, SQL Server Compact, Oracle and MySQL.
Import and Export Data Wizard
You launch the Import and Export Data wizard from the SQL Server program group. After an initial welcome screen, you will see the Choose a Data Source dialog as shown below:
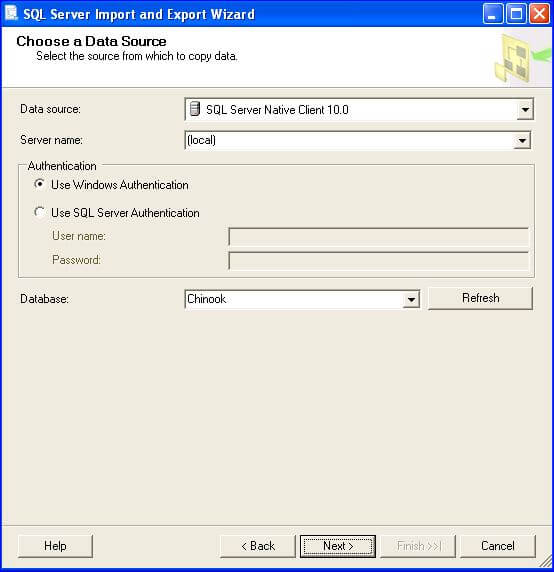
SQL Server Native Client 10.0 is the default data source; this is what you want for a SQL Server 2008 database. Windows Authentication is also the default; this means you will execute the SSIS package as the currently logged on user. Alternatively you can select SQL Server Authentication and supply a username and password. Select Chinook from the Database dropdown.
After clicking Next to continue you will see the Choose Destination dialog as shown below:
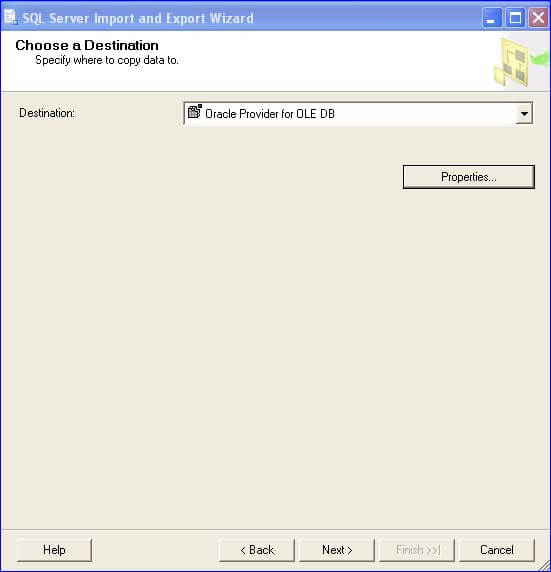
The Destination will also default to SQL Server Native Client 10.0; select Oracle Provider for OLE DB from the dropdown. Click the Properties button to enter the details about the Oracle destination as shown below:
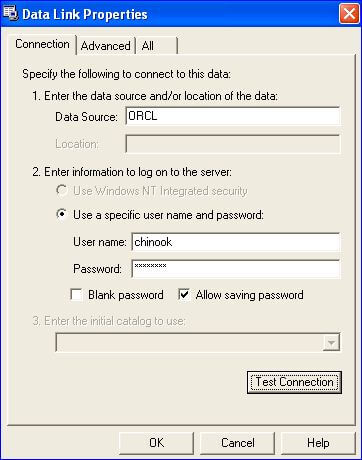
The Data Source is defined in the tnsnames.ora file for the Oracle client. I have the Oracle 9i client installed in the folder D:\OraClient9i so the tnsnames.ora file will be in the D:\OraClient9i\Network\Admin folder. An example of the tnsnames.ora file is shown below:
Click OK on the Data Link Properties dialog then click Next. You will see the Specify Table Copy or Query dialog as shown below:
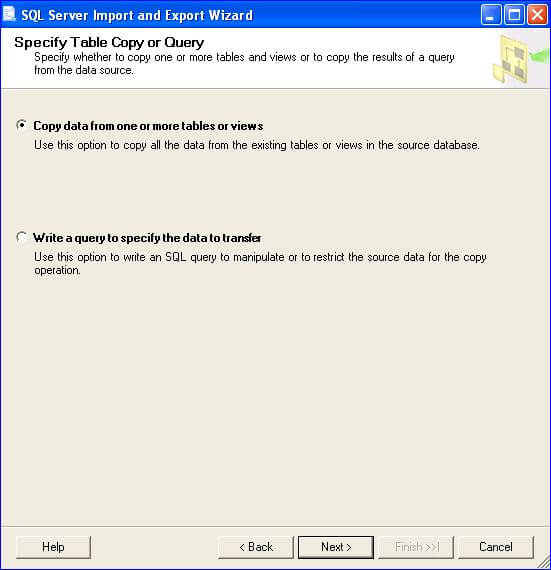
Click Copy data from one or more tables or views; this will allow you to select tables and views to export from the SQL Server database. The Write a query to specify the data to transfer will allow you to enter your own query to select the data that you want.
After clicking Next you will see the Select Source Tables and Views dialog as shown below:
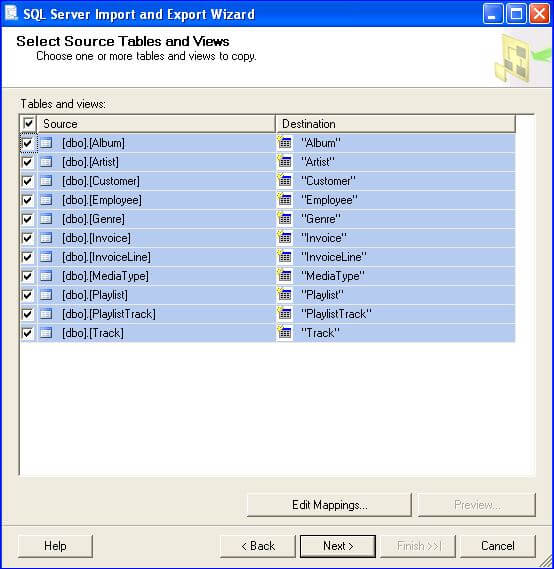
I selected all of the tables in the Chinook database. You can select a row then click the Edit Mappings button to display the Column Mappings dialog as shown below:
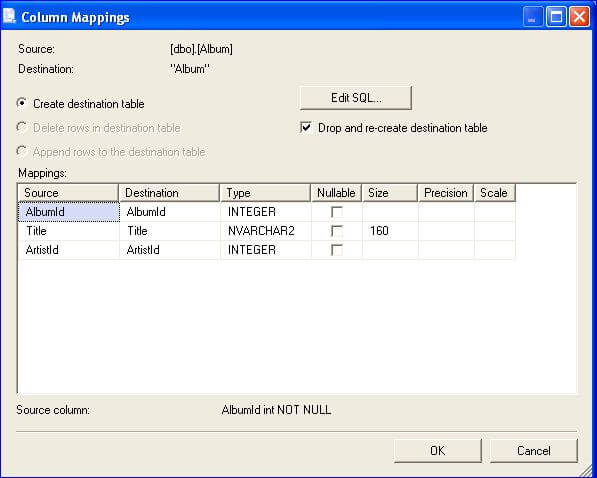
The above dialog allows you to drop the destination table and edit the SQL to create the table. You can also edit the Source to Destination column mappings. Click on a Destination column and you can change it by selecting a different column in the dropdown. Click OK to close the dialog then click Next; you will see the Save and Run Package dialog as shown below:
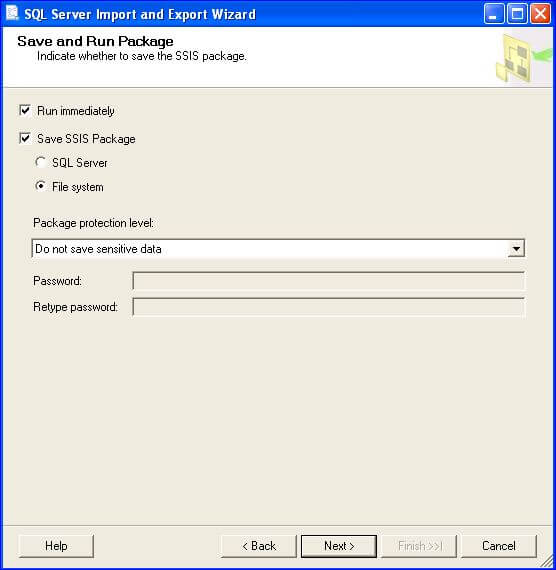
Click the Run Immediately checkbox to execute the SSIS package; click the Save SSIS Package checkbox to save a copy of it to either SQL Server or the file system. As a general rule you don't want to store passwords unencrypted in an SSIS package. The Package protection level dropdown has various encryption options. For our purposes we're going to select "Do not save sensitive data" which will not save the password in the SSIS package. Click Next and you will see the Save SSIS Package dialog as shown below:
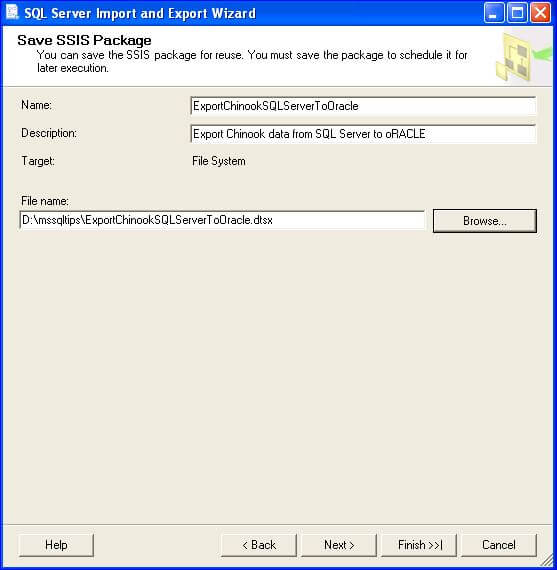
Name is the filename for the SSIS package. You can click Browse to navigate to the folder where you want to save the SSIS package. Click Next and you will see the Complete the Wizard dialog as shown below:
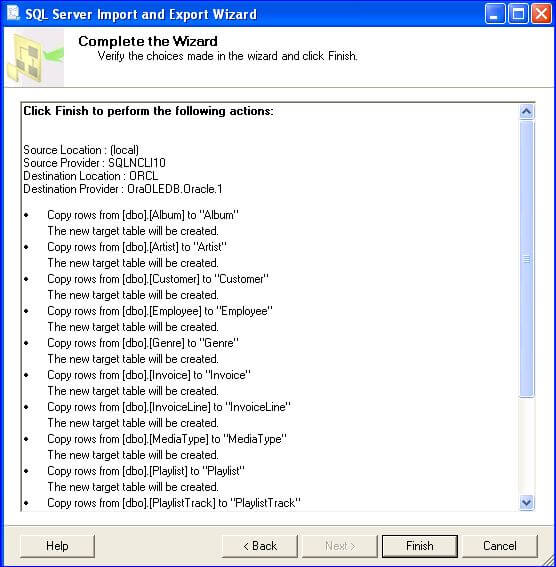
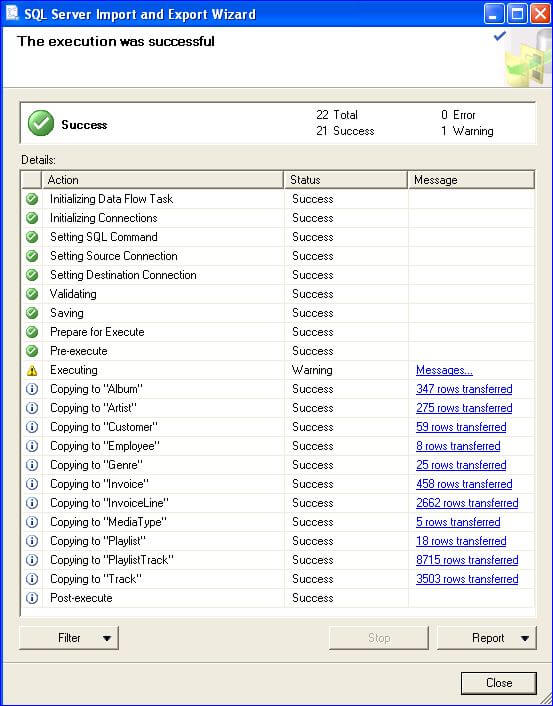
Click Finish to execute and save the SSIS package. You will see the following dialog (the screen shot was taken after the SSIS package finished):
Review the SSIS Package
SQL Server includes the Business Intelligence Development Studio (BIDS) which is where you can use the graphical designer to create and maintain your SSIS packages. Launch BIDS from the SQL Server program group; select File, Open, File from the menu and navigate to the folder where you saved the SSIS package and open it. The following is an example of the SSIS package that is generated:
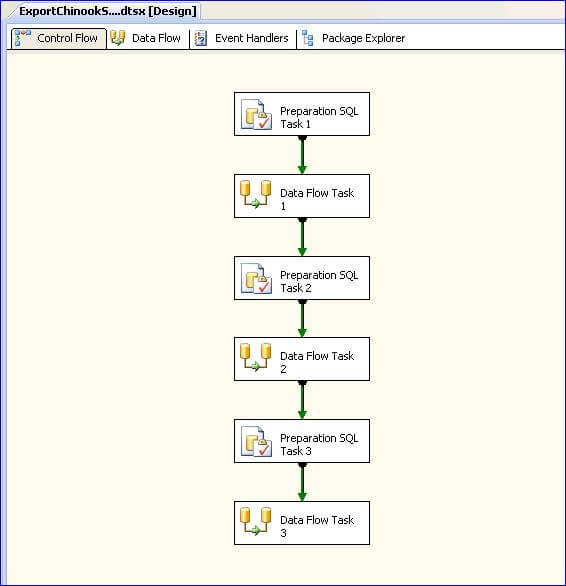
The Preparation tasks each create a group of tables in the Oracle database. The Data Flow tasks copy the data from a group of SQL Server tables to the Oracle tables. You can add whatever kind on logic you need to the SSIS package that gets generated.
Back on the Column Mappings dialog I clicked Drop and re-create destination table for the Album table. However, I did not see where the SSIS package dropped the table before creating it. If you need to drop the tables in the Oracle database, you can add a new Execute SQL task as the first task in the package and drop the tables.
Next Steps
- The Import and Export Data wizard is a good starting point when you need to copy a group of tables from one database to another.
- You may need to do more than just copy data from one database to another. The Import and Export Data wizard generates an SSIS package that you can modify as necessary.
- For an introduction to SSIS, take a look at our our SQL Server Integration Services Tutorial.
- To dig in to more details on SSIS, take a look at our SQL Server Integration Services Tips.
- You can download the sample package from this tip here.
I like the valuable information you provide in your articles. I will bookmark your blog and check again here frequently. I am quite certain I will learn lots of new stuff right here! Good luck for the next!sql training in Chennai | sql certification
ReplyDelete