Search This Blog

Friday, January 24, 2014

Simple script to backup all SQL Server databases


Problem

Sometimes things that seem complicated are much easier then you think and this is the power of using T-SQL to take care of repetitive tasks.  One of these tasks may be the need to backup all databases on your server.   This is not a big deal if you have a handful of databases, but I have seen several servers where there are 100+ databases on the same instance of SQL Server.  You could use SQL Server Management Studio to backup the databases or even use Maintenance Plans, but using T-SQL is a much simpler and faster approach.
Solution
With the use of T-SQL you can generate your backup commands and with the use of cursors you can cursor through all of your databases to back them up one by one.  This is a very straight forward process and you only need a handful of commands to do this. 
Here is the script that will allow you to backup each database within your instance of SQL Server.  You will need to change the @path to the appropriate backup directory.

File Naming Format DBname_YYYYDDMM.BAK

DECLARE @name VARCHAR(50) -- database name  
DECLARE @path VARCHAR(256) -- path for backup files  
DECLARE @fileName VARCHAR(256) -- filename for backup  
DECLARE @fileDate VARCHAR(20) -- used for file name

 
-- specify database backup directory
SET @path = 'C:\Backup\'  

 
-- specify filename format
SELECT @fileDate = CONVERT(VARCHAR(20),GETDATE(),112) 

 
DECLARE db_cursor CURSOR FOR  
SELECT name 
FROM master.dbo.sysdatabases 
WHERE name NOT IN ('master','model','msdb','tempdb')  -- exclude these databases

 
OPEN db_cursor   
FETCH NEXT FROM db_cursor INTO @name   

 
WHILE @@FETCH_STATUS = 0   
BEGIN   
       SET @fileName = @path + @name + '_' + @fileDate + '.BAK'  
       BACKUP DATABASE @name TO DISK = @fileName  

 
       FETCH NEXT FROM db_cursor INTO @name   
END   

 
CLOSE db_cursor   
DEALLOCATE db_cursor

File Naming Format DBname_YYYYDDMM_HHMMSS.BAK

If you want to also include the time in the filename you can replace this line in the above script:
-- specify filename format
SELECT @fileDate = CONVERT(VARCHAR(20),GETDATE(),112)
with this line:
-- specify filename format
SELECT @fileDate = CONVERT(VARCHAR(20),GETDATE(),112) + REPLACE(CONVERT(VARCHAR(20),GETDATE(),108),':','')

Notes

In this script we are bypassing the system databases, but these could easily be included as well.  You could also change this into a stored procedure and pass in a database name or if left NULL it backups all databases.  Any way you choose to use it, this script gives you the starting point to simply backup all of your databases.
Also, if you wanted to bypass some of your user databases you can include them in the NOT IN section as well.
Next Steps
  • Add this script to your toolbox
  • Modify this script and make it a stored procedure to include one or many parameters
  • Enhance the script to use additional BACKUP options
ref: http://www.mssqltips.com/sqlservertip/1070/simple-script-to-backup-all-sql-server-databases/?utm_source=dailynewsletter&utm_medium=email&utm_content=headline&utm_campaign=20140117
By:   

Thursday, January 23, 2014

Ways to compare and find differences for SQL Server tables and data

Problem

Sometimes we need to compare tables and/or data to know what was changed. This tip shows you different ways to compare data, datatypes and tables.
Solution
I will show you different methods to identify changes. Let's say that we have two similar tables in different databases and we want to know what is different:
create database dbtest01
go
USE dbtest01
GO
CREATE TABLE [dbo].[article](
 [id] [nchar](10) NOT NULL,
 [type] [nchar](10) NULL,
 [cost] [nchar](10) NULL,
 CONSTRAINT [PK_article] PRIMARY KEY CLUSTERED 
(
 [id] ASC
)WITH (PAD_INDEX = OFF, STATISTICS_NORECOMPUTE = OFF, IGNORE_DUP_KEY = OFF, ALLOW_ROW_LOCKS = ON, ALLOW_PAGE_LOCKS = ON) ON [PRIMARY]
) ON [PRIMARY]
GO
insert into [dbo].[article] values
('001','1','40'),
('002','2','80'),
('003','3','120')
GO
create database dbtest02
go
USE dbtest02
GO
CREATE TABLE [dbo].[article](
 [id] [nchar](10) NOT NULL,
 [type] [nchar](10) NULL,
 [cost] [nchar](10) NULL,
 CONSTRAINT [PK_article] PRIMARY KEY CLUSTERED 
(
 [id] ASC
)WITH (PAD_INDEX = OFF, STATISTICS_NORECOMPUTE = OFF, IGNORE_DUP_KEY = OFF, ALLOW_ROW_LOCKS = ON, ALLOW_PAGE_LOCKS = ON) ON [PRIMARY]
) ON [PRIMARY]
GO
insert into [dbo].[article] values
('001','1','40'),
('002','2','80'),
('003','3','120'),
('004','4','160')
GO
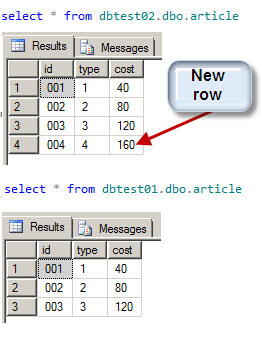
The T-SQL code generates 2 tables in different databases. The table names are the same, but the table in database dbtest02 contains an extra row:
The tables
Let's look at ways we can compare these tables using different methods.

Compare Tables Using a LEFT JOIN

With the left join we can compare values of specific columns that are not common between two tables.
For example:
select * 
from dbtest02.dbo.article d2
left join dbtest01.dbo.article d1 on d2.id=d1.id
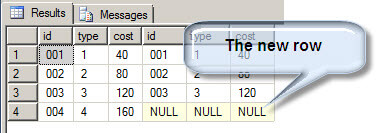
The left join shows all rows from the left table "dbtest02.dbo.article", even if there are no matches in the "dbtest01.dbo.article":
Left join
In this example, we are comparing 2 tables and the values of NULL are displayed if there are no matching rows. This method works to verify new rows, but if we update other columns, the left join does not help. Is there another method to compare tables?  Let's use the Except clause to see what we can find.

Compare Tables Using the EXCEPT Clause

The Except method shows the difference between two tables (the Oracle guys use minus instead of except and the syntax and use is the same). It is used to compare the differences between two tables. For example, let's see the differences between the two tables:
Now let's run a query using except:
select * from dbtest02.dbo.article
except
select * from dbtest01.dbo.article
The except returns the difference between the tables from dbtest02 and dbtest01:
Except
If we flip the tables around in the query we won't see any records, because the table in database dbtest02 has all of the records plus one extra.
This method is better than the first one, because if we change values for other columns like the type and cost, the except will notice the difference. Here is an example if we update id "001" in database dbtest01 and change the cost from "40" to "1".  If we update the records and then run the query again we will see these differentness now:
except clause differences
Unfortunately it does not create a script to synchronize the tables. Is there a way to compare tables and synchronize results?

Compare Tables Using the Tablediff Tool

There is a nice command line tool used to compare tables.  This can be found in "C:\Program Files\Microsoft SQL Server\110\COM\" folder. This command line tool is used to compare tables. It also generates a script with the insert, update and delete statements to synchronize the tables. For more details, refer to this tablediff article.

Compare Changes in a Table Using the Change Data Capture CDC

This feature was added in SQL Server 2008. You need to enable this feature and you also need to have SQL Server Agent running. Basically it creates system tables that track the changes in your tables that you want to monitor. It does not compare tables, but it tracks the changes in tables.
For more information, refer to this article: Using Change Data Capture (CDC) in SQL Server 2008.

Compare Data Types Between Two Tables

What happen if we want to compare the data types? Is there a way to compare the datatypes?
Yes, we can use the [INFORMATION_SCHEMA].[COLUMNS] system views to verify and compare the information. We are going to create a new table named dbo.article2 with a column with different data type than the dbo.article table:
USE dbtest01
GO
CREATE TABLE [dbo].[article2](
 [id] [int] NOT NULL,
 [type] nchar(10) NULL,
 [cost] nchar(10) NULL,
 CONSTRAINT [PK_article1] PRIMARY KEY CLUSTERED 
(
 [id] ASC
)WITH (PAD_INDEX = OFF, STATISTICS_NORECOMPUTE = OFF, IGNORE_DUP_KEY = OFF, ALLOW_ROW_LOCKS = ON, ALLOW_PAGE_LOCKS = ON) ON [PRIMARY]
) ON [PRIMARY]
GO
The difference is that the id is now an int instead of nchar(10) like our other tables.
The query to compare data types of the article and article 1 would be:
USE dbtest01
GO
select c1.table_name,c1.COLUMN_NAME,c1.DATA_TYPE,c2.table_name,c2.DATA_TYPE,
c2.COLUMN_NAME 
from [INFORMATION_SCHEMA].[COLUMNS] c1
left join [INFORMATION_SCHEMA].[COLUMNS] c2 on c1.COLUMN_NAME=c2.COLUMN_NAME
where c1.TABLE_NAME='article'
and c2.TABLE_NAME='article2'
and c1.data_type<>c2.DATA_TYPE
  
The results are as follows:
Except
The query compares the data types from these two tables. All the information of the columns can be obtained from the [INFORMATION_SCHEMA].[COLUMNS] system view. We are comparing the table "article" with the table "article2" and showing if any of the datatypes are different.

Compare if there are Extra Columns Between Tables

Sometimes we need to make sure that two tables contain the same number of columns. To illustrate this we are going to create a table named "article3" with 2 extra columns named extra1 and extra2:
USE dbtest01
GO
CREATE TABLE [dbo].[article3](
 [id] [int] NOT NULL,
 [type] nchar(10) NULL,
 [cost] nchar(10) NULL,
 extra1 int,
 extra2 int
)
In order to compare the columns I will use this query:
USE dbtest01
GO
select c2.table_name,c2.COLUMN_NAME
from [INFORMATION_SCHEMA].[COLUMNS] c2
where table_name='article3'
and c2.COLUMN_NAME not in (select column_name 
    from [INFORMATION_SCHEMA].[COLUMNS] 
    where table_name='article')
The query compares the different columns between table "article" and "article3". The different columns are extra1 and extra2. This is the result of the query:
compare extra columns

Compare Tables in Different Databases

Now let's compare the tables in database dbtest01 and dbtest02. The following query will show the different tables in dbtest01 compared with dbtest02:
select 'dbtest01' as dbname, t1.table_name
from dbtest01.[INFORMATION_SCHEMA].[tables] t1
where table_name not in (select t2.table_name
    from 
    dbtest02.[INFORMATION_SCHEMA].[tables] t2  
    )
union
select 'dbtest02' as dbname, t1.table_name
from dbtest02.[INFORMATION_SCHEMA].[tables] t1
where table_name not in (select t2.table_name
    from 
    dbtest01.[INFORMATION_SCHEMA].[tables] t2  
    )
compare tables between databases

Third Party Tools

There are great tools to compare tables including data and schemas. You can use Visual Studio or use other SQL Server Comparison tools.

ref:http://www.mssqltips.com/sqlservertip/2779/ways-to-compare-and-find-differences-for-sql-server-tables-and-data/?utm_source=dailynewsletter&utm_medium=email&utm_content=headline&utm_campaign=20140124
Wednesday, January 22, 2014

What's new in SQL Server 2014? Is it worth the upgrade?


There is a great deal of information about the upcoming SQL Server 2014 version, especially about Hekaton which is the In-Memory OLTP engine feature of SQL Server 2014. But is Hekaton the only new feature in SQL Server 2014?  In this tip I will guide you through the new features that make SQL Server 2014 so outstanding.
Solution
Sometimes software vendors launch new versions of their products with minimal improvements with the sole purpose of maintaining visibility amongst competitors. Since migration of databases is a time consuming and expensive task, we as database professionals must decide what is best for our customers. That forces us to do some research about the new version’s features in order to make the most accurate decision.
Let's take a look at the new features and improvements with SQL Server 2014.

SQL Server In-Memory OLTP Overview

SQL Server 2014 includes an In-Memory OLTP engine code named Hekaton. This engine provides a lock and latch free environment for OLTP workloads. It is fully integrated into SQL Server and accessed using standard T-SQL. Contrary to other products in the market, Hekaton is not a separate system, it is part of the SQL Server Database Engine.  Hekaton enables you to use both disk based tables and Memory-Optimized Tables together in the same queries and stored procedures.
Memory-Optimized tables can be defined as durable, so data persists on server restart and with schema only duration to preserve table definition alone, useful for ETL transformations and data staging.
Furthermore, Hekaton introduces Natively Compiled Stored procedures which are Transact-SQL Stored Procedures compiled to native code, to interact with Memory-Optimized Tables even more efficiently.
You can read more about Memory-Optimized tables and Natively Compiled Stored Procedures in my previous tips.

SQL Server 2014 Cloud Computing Enhancements

Since this version of SQL Server was designed with the premise of being a platform for a Hybrid Cloud it has some new and exciting features.
An on-premise SQL Server can have databases in which its data and log files are stored on Windows Azure Storage. This means that you can move your storage into the cloud while keeping all the transaction processing on your local server. Furthermore you can enable Transparent Data Encryption on databases while keeping the encryption key on the local server for added security.
You can deploy a SQL Server Database to a Windows Azure Virtual Machine with a few clicks with the SQL Server Management Studio Deploy a SQL Server Database to a Windows Azure Virtual Machine Wizard.
This release also includes the possibility to Backup and Restore to/from a URL directly with SQL Server Management Studio.

Friday, January 10, 2014

Export data from MySQL to SQL Server

Problem

Many people want to create a customized migration process using SQL Server Integration Services (SSIS), but it is hard to start working with heterogeneous databases like MySQL, Postgres, DB2, etc. Check out this tip to learn about how to import data from heterogeneous databases like MySQL to SQL Server.
Solution
In this example, the database used to import data from is the Test Database in MySQL which is installed by default. We will import data from MySQL to SQL Server using SQL Server Integration Services.

MySQL Prerequisites

To follow the steps in this tip it is necessary to have the following software installed:
Let's create a table in MySQL called myTable with a column called myColumn then insert some data in the table:
use MySQL;
create table myTable(myColumn varchar(20));
insert into myTable(myColumn) values("John");
insert into myTable(myColumn) values("Jane");
insert into myTable(myColumn) values("Arnold");
insert into myTable(myColumn) values("Jessica");

Using SQL Server Integration Services to import data from MySQL to SQL Server

Here are the steps to create the SSIS project:
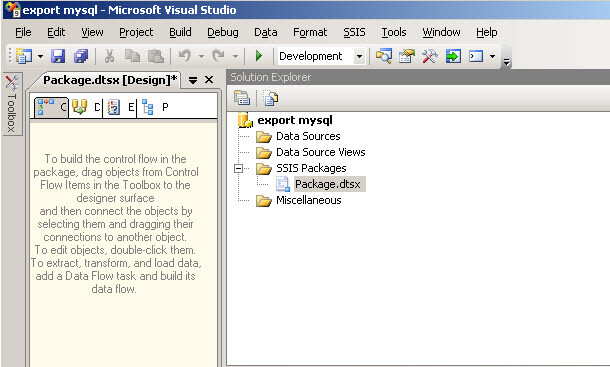
  1. Start SQL Server Business Intelligence Development Studio and start an Integration Service Project.
  2. Create a new project and select Integration Services Project.

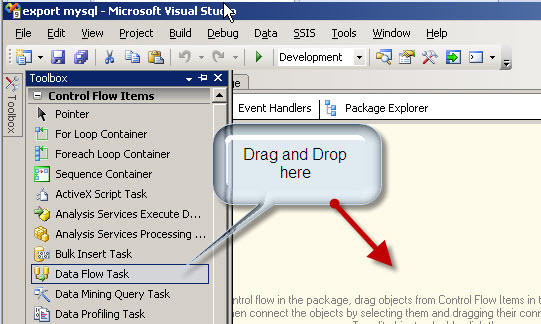
  3. In the toolbox drag and drop the Data flow task onto the design surface of the Control Flow tab.

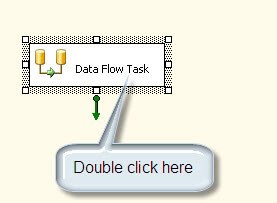
  4. Double click in the Data Flow task in the Design pane.

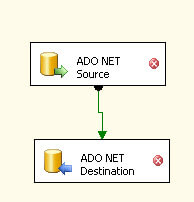
  5. In the Data Flow tab, drag and drop the ADO.NET Source and ADO.NET Destination to the design pane, join both tasks with the green arrow.

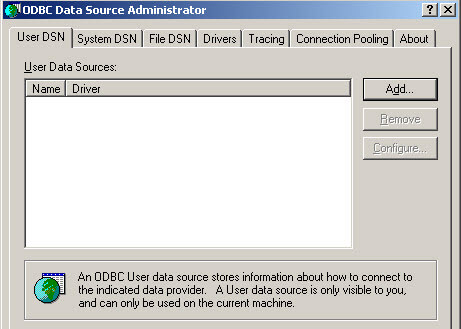
  6. Go to Windows start menu | Administrative tools | Data Sources (ODBC) and click the Add button.

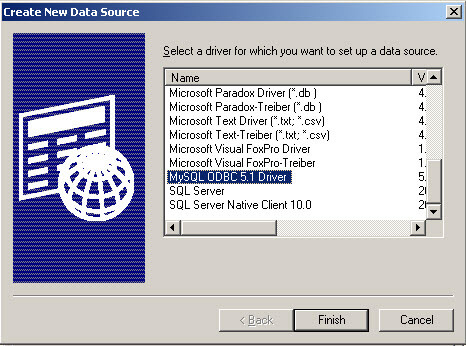
  7. Select the MySQL ODBC driver and press Finish.  Please note this driver is installed with the connector specified in the prerequisites section above.

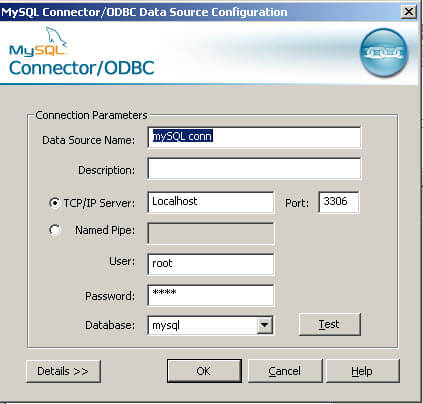
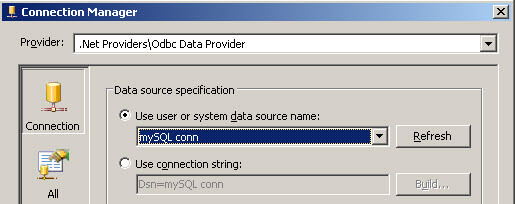
  8. Specify the Data Source Name. e.g. "MySQL conn".
  9. Specify the TCP/IP Server.  It can be the IP or the localhost if the machine used is the local machine.
  10. Specify the user, in this case root and the password.  Ask to the MySQL administrator if you do not know the user database password).
  11. Select the MySQL database.

  12. Congratulations! You have a ODBC connection. Now let's use it in SSIS and return to the SSIS project.
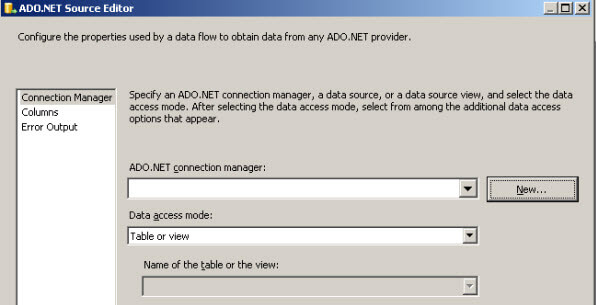
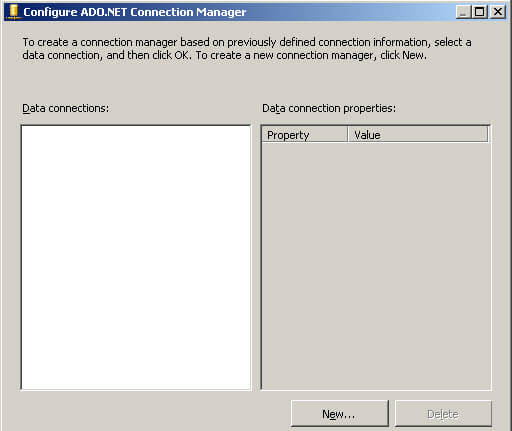
  13. Double click in the ADO Net Source and press the new button.

  14. Press the new button again to add a connection.

  15. This is important, in the provider, select the .NET Providers\ODBC Data Provider. The ODBC connection will be displayed. Select the connection created in step 8 and press OK.

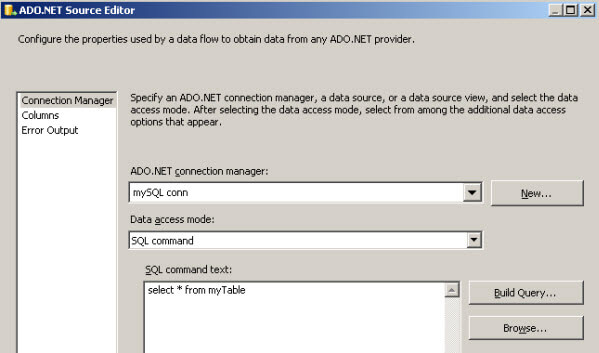
  16. In the ADO.NET source editor, in Data access mode, select SQL Command.
  17. In the SQL command test, write "select * from myTable" and press OK.  In this step you are writing the query to access to MySQL table created at the beginning.

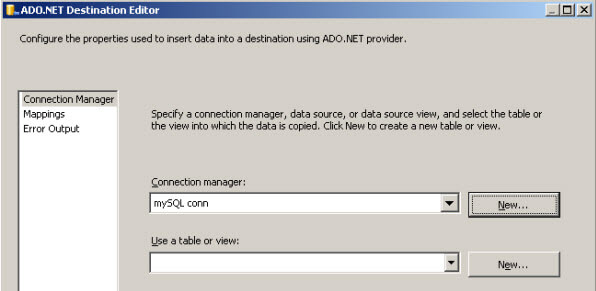
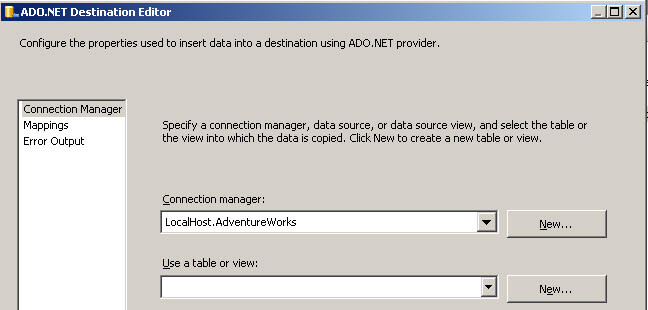
  18. Double click in the ADO.NET Destination task and in the Connection manager press New.

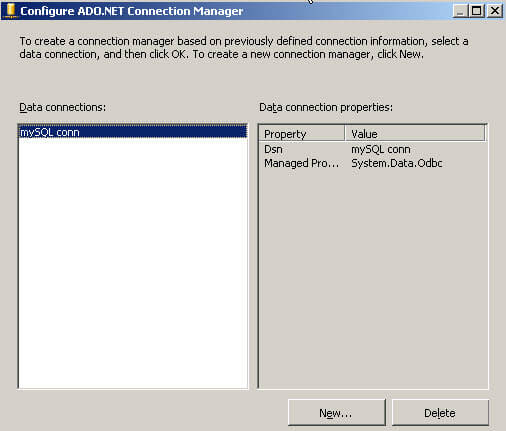
  19. In the Configure ADO.NET Connection Manager press new again.

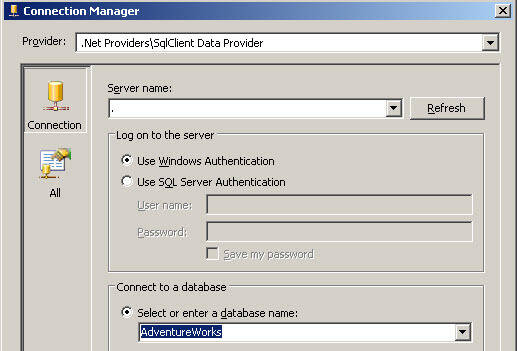
  20. In the connection manager specify the SQL Server instance name (in this example the localhost is a dot) and select a Database where you want to import the MySQL Database and press OK.  In this example the Adventureworks database is used, but any database can be used instead.

  21. In the ADO.NET Destination Editor, click new in the Use a table or view option.

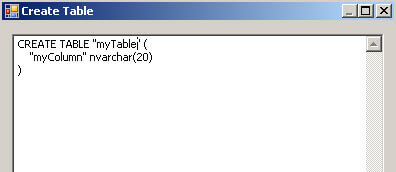
  22. In the Create Table box, use this code:
            CREATE TABLE "myTable" (
                "myColumn" nvarchar(20)
            )


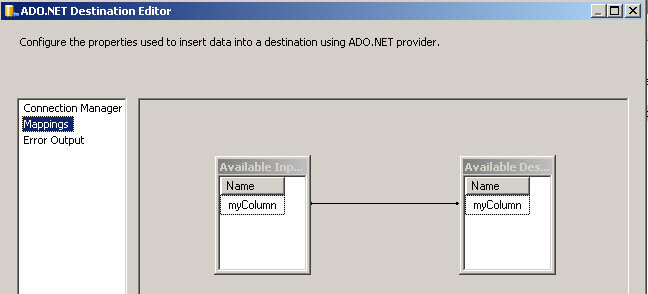
  23. In the ADO.NET Destination Editor, click the Mapping page and press OK.

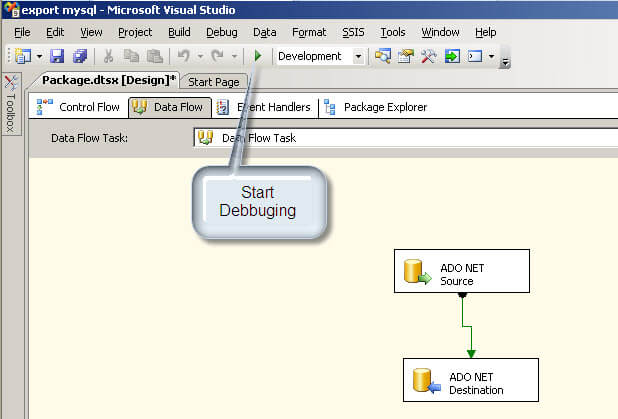
  24. We are ready. Press the Start Debugging icon as shown below.

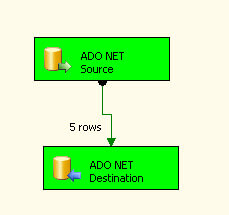
  25. You will see the tasks in green which means the tasks were completed successfully with the associated row count.

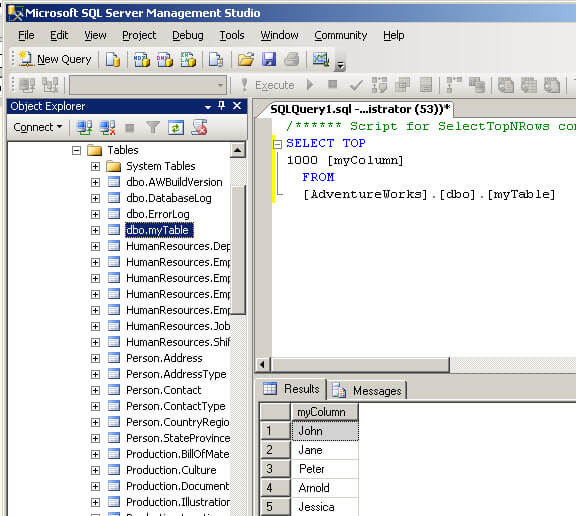
  26. Last, but not least, open the Microsoft SQL Server Management Studio and verify in the instance and database used that the new table myTable was created and also that it contains the data specified.

Next Steps
  • SSIS enables you import and export data from multiple sources. With the providers help, it is possible to interact not only with MySQL, but with just about any data source